Showing posts with label Shop Notes. Show all posts

Friday, December 19, 2014

The Bosco Bar


Ten years ago I built up my Titanium General Purpose Commuter/City Bike (TGPCCB) and it has served me well.  Over the years I've messed with different drive train configurations and little tweaks here and there but one thing that remained constant was the original handlebar.  Because the frame was intended as a mountain bike I naturally mounted it up with a flat mountain bike style bar.  While I'm usually pretty good at thinking outside the box I never gave my handlebar much thought and just put up with the uncomfortable bent over position the straight bar.

Many recumbent advocates will say that a recumbent bike makes a fine commuter but I disagree. In my experience with lots of starts and stops and busy streets I believe the upright safety bicycle configuration makes the most sense as a city/commuter ride.  On the open road that's another the story.  Of course in that application the recumbent outshines them all. 

Back to the subject of this post.  The last couple years I have been commuting to and from my day job more often than ever before.  My trips around town are usually very short amounting to 20 minutes or less.  While that is not a long enough sitting to incite the aggravation of a bent over riding position the flat bar slowly became my bike's least favorite attribute.

One of my favorite luminaries of the bicycle world is Grant Petersen who is a great author and proprietor of the amazing Rivendell Bicycle Works.  As I've gotten older and more retro-grouchy I've come to appreciate the idea that bicycles can be rolling versions of artistic expression and vehicles of fun instead of just performance oriented machines derived from the latest and greatest of the racing world.  Grant's philosophy has really changed my thinking on how I ride and how I tailor my equipment to match the riding style. 

One day while I was wandering around the Internet I came across a handlebar called the Bosco Bar.  I liked the old school euro city bike look of the thing and right away I thought that's what I need for the Ti GP.  Upon further investigation I discovered this bar was the brainchild of Mr. Petersen and manufactured by Nitto of Japan.  Built in a few different widths and versions made of chromoly steel and aluminum the bars are very high in quality and finish.  Established on February 11, 1923 in Tokyo; Nitto has built a fine reputation as one of the worlds oldest bicycle component makers.

Unfortunately the more affordable steel bars were sold out and on back order and impatient as I am I settled instead for the aluminum version which was in stock.  The good folks at Rivendell had the bar boxed up, across the country and to my doorstep in five days.  Thanks guys!

I sourced a new cable kit and a thumb shifter because the old cables and jackets would be way to short for the reach of the new bars.  
  

The modern Shimano trigger shifter I was using for the 1x9 drivetrain did work flawlessly but I thought the look would be off on the Bosco bar so I relegated it to the spare parts bin.  I remember two of my first mountain bikes back in the 1980's had thumb shifters and I always loved them so it's great to finally have a thumbie perched back on my bar.


The Bosco only comes in silver polished alloy or steel so I had some decision making to do in keeping with the black on Ti theme of my bike.  I thought about simply roughing the bar up and going at it with some flat black rattle can but the Nitto is just too nice for that.  Another idea I had was to slip on some black shrink tubing over the bars to get a uniform utilitarian look.  Ultimately thanks again to the Internet I found out the cool kids were wrapping their bars with old fashioned cotton bar tape. 
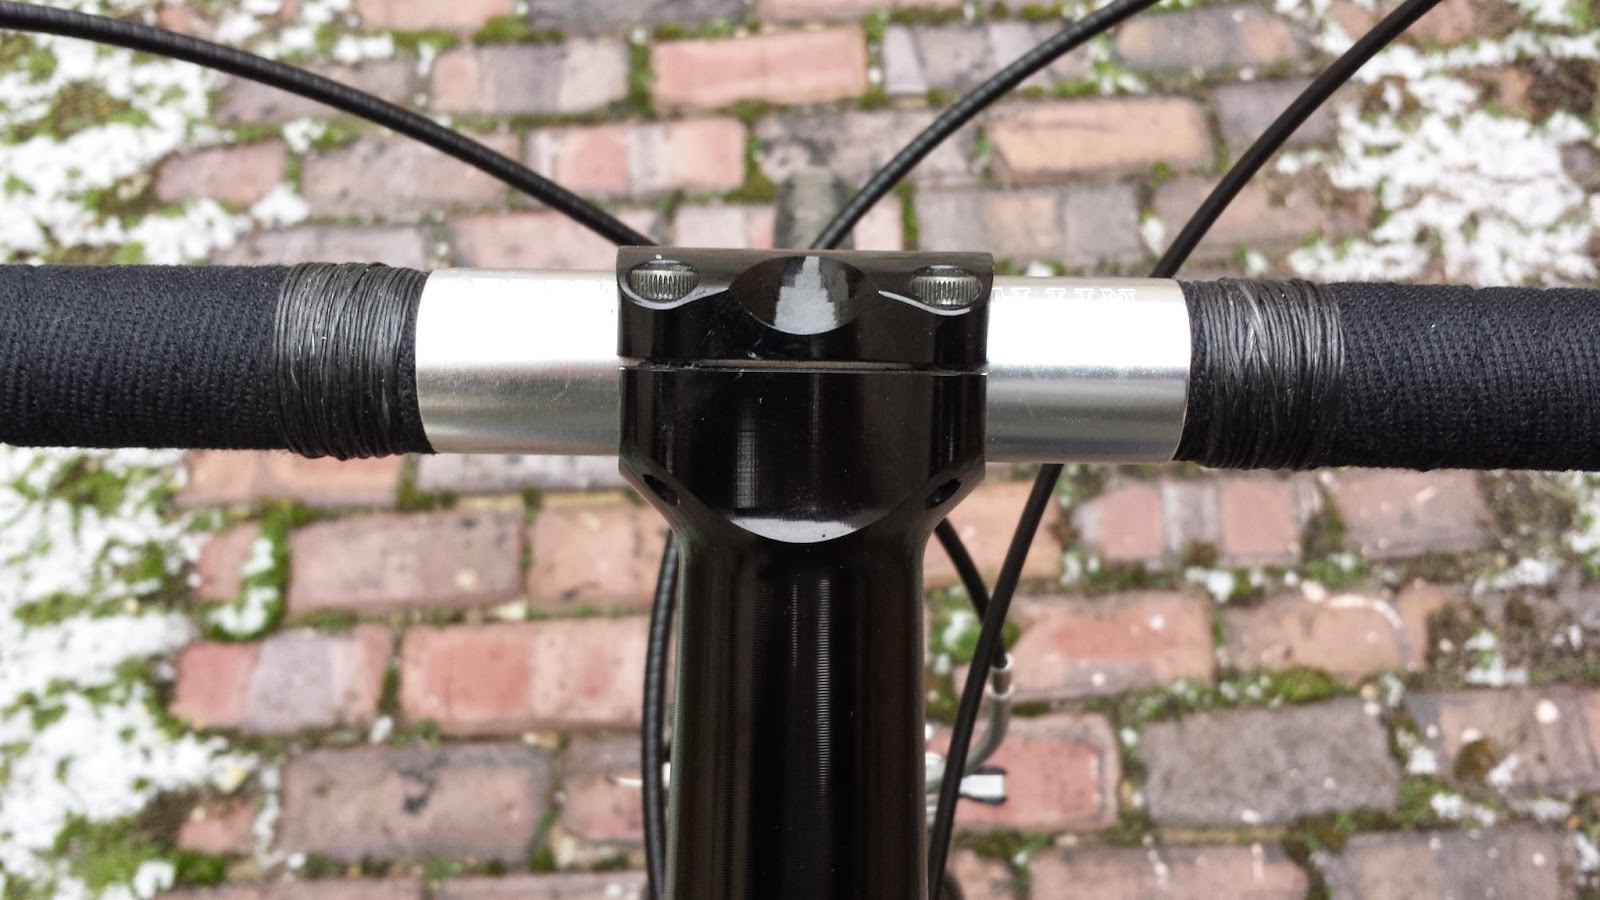

I stopped short of getting out the shellac but I did finish off the end of the wraps with some waxed linen serving from my archery supplies.  Very sharp if I do say so!
  

Here's the cockpit view of the controls.  A little dusting of snow for the morning commute and just right in the holiday season.

Per the instructions I used my calibrated eyeball to put 6 degrees or thereabouts of tilt to the bars for optimal comfort and boy do they deliver.  I've only ridden about an hour so far on the new bars but I am very impressed with the feel of the Boscos.  Before mounting them up I was a little concerned about tiller effect with my hands back a bit of the steering axis but the control and reach is perfect. The bike feels more natural now than it ever has.  With a longish 23 1/2" top tube I believe the Bosco clamped up in a 110mm stem is about as close to perfection as the bike is going to get.


With the old flat bar and its more aggressive leaned over riding position the WTB saddle was acceptable even on longer rides but now sitting nearly bolt upright I'm thinking a seat upgrade may be in the future.  I've been eyeing those fancy Brooks leather saddles with the wider seat and springs underneath and that just might be the ticket.
  

Tuesday, May 6, 2014

Spring Cleaning


Finally Springtime has rolled around and I actually look forward to cleaning up my commuter bike.  I try to keep it out of the worst of the winter mess but it ends up grimy and salty no matter what.  A couple years ago I started using an Automotive washing soap in my bucket of hot water instead of the dish soap from the kitchen.  I read something somewhere about the sulfates in dish soap being bad for paint and clear coats but I don't have to worry about that with bare titanium tubes.  The difference I have noticed is that the the car wash stuff cuts the grease and rim brake dust much more effectively than it's kitchen cousin.


Flossing the cogs!

I use a wax based lube on my chain. It doesn't last like a wet lube so it has to be regularly reapplied. The one downside to overzealous lubrication is that it tends to gum up between the cogs.  A piece of old cotton sock drenched in a solvent like WD-40 makes an ideal floss to clean those sprockets.  Positioning the hub against my bucket and with my feet boxing in the tire I use a side to side motion with the cloth to work down between the gears.  The pull to the left spins the freewheel about an eighth of a turn.  Sliding back to the right engages the pawls locking the sprocket and allowing the rag to do its thing.  With some experimentation the thickness of the cloth can be found that best slides between the teeth without snagging and with a little practice eight or ten back and forth cycles between each gear leaves them all clean and polished.


I picked up a new Park chain tool last year and finally had a chance to use it to putting on a fresh drive chain.  


A clean drivetrain is a quiet drivetrain.  And that makes me a happy rider.


The Ti General Purpose Bike serviceable and ready for commuting duty.


Wednesday, April 10, 2013

Cycling Update


Spring finally showed up here in Ohio this past weekend.  To say that I was ready to get on my bike and ride would be the understatement of the year.  I've been busy with my home renovation projects and that has not left much time for riding.  Fortunately until now the weather has been cold, windy and rainy so it's been easy to work indoors and I have gotten a lot done.  

On Saturday the skies were sunny and the temperature climbed into the 60's.  My friend the Road Queen and I enjoyed the afternoon on our bikes and traveled from Lexington to Butler, Ohio and back along the B & O Trail in Richland County for a total of just over 23 miles.  After many weeks of upright riding on my commuter bike it was grand to get out and stretch my legs aboard the recumbent.  The Road Queen even even took a try at piloting the HP Velotechnik and after a few miss-starts she was flowing somewhat smoothly in a straight line. 

--

Another thing the warm temperatures and sunshine of spring bring out besides flowers are classic cars. I'm not a car guy but I am a craftsman and I love tinkering with tools and machines so I can certainly appreciate a good street rod.  On an urban bike cruise around town on Sunday morning we spotted this  old International and I couldn't resist a closer look.  

I could use that to haul some mulch for the flowerbed. 

After lunch we spent the afternoon relaxing on the patio.  I like to kick back with a little bicycle maintenance; Very much so when I can do it under a warm sun in the backyard.  I've had a set of brake and shifter cables to replace the control lines on my Ti General Purpose bike laying around for nearly a month but have been too busy to get to the job.  The outer jackets on the old cables were literally disintegrating after six years or more they had been in service.


As a long time bike rider and home bicycle mechanic I actually enjoy doing my own work.  After replacing cables on existing bikes or installing them on new ones over the years repetition has allowed me to become quite comfortable with the task.  In this case a re-cable job is particularly easy because the old jackets could be used as a sort of template to cut the new outer jackets to the perfect size.  I'm a bit OCD so I like my cable lengths and routing just right and any amount of time and effort is worth it to dial in perfection.

I don't own the Park Tool cable cutter and I probably never will.  I prefer my Dremel tool and a cutoff wheel to cleanly sever my cables and jackets.  The rotary cutting action makes a perfect slice without a single strand of the cable lifting out of place.


Of course the Park bicycle stand I use and love is considered an essential tool for my activities.  Getting the work up to eye and hand level really enhances the ease and enjoyment of bicycle maintenance. 

While I've not been getting in many fun rides I have been putting in a few miles commuting.  Last week I logged 4 out of five days on two wheels leaving the four wheeler at home in the drive.  On my way to work on Monday I admired my new black cabling.  They coordinate nicely with the fenders and other darkened components of the Ti GP bike if I do say so myself.


Friday, February 8, 2013

Shop Notes -- Woodworking


Before sub-freezing temperatures returned to the Ohio Valley I managed to complete the machining work on the replacement windowsill for my kitchen.  I got a brand new blade for my garage sale band saw and now cuts are true and precise. The shot above shows the shows the blade's path straight down the line.  These cuts out on the end of the board can't be done on the table saw without a special jig so with a slow and steady feed rate provided by me the band saw works great.


Any slight irregularities are quickly cleaned up with a file.

Oak is a very hard wood so a keen edge on all cutting tools is essential for clean accurate cuts without burns or grain tear out.  
  

Back to the table saw to make two more cuts that remove stock from the bottom inside edge of the sill.  This hollows out a straight section that will rest on the window framing and lock it into place horizontally. 


Putting a small radius on all the exposed edges of the sill was my favorite part of this project.  I do the work by hand using files, sanding block and various grades of abrasive paper. After lightly sanding the remaining surfaces I applied the first coat of polyurethane. At this point I'm just waiting for a break in the weather so I can heat up the workshop enough to continue on with the clear coating.


Wednesday, January 30, 2013

Workshop Activity


Here's a few shots taken around the shop over the last few days. Finally we have a three day January thaw that has allowed me to get some work done. Yesterday I used paint stripper to clean the old layers of paint from this cold air return grill and  restore it to bare metal.  I used a wire brush, a scotchbrite pad and a bit of elbow grease to remove the slimy residue from between the louvers. Yuck!


After looking at grills at the local big box I noticed my 60 year old cover was stamped from thicker steel and was overall better quality than what was available at the store.  Ultimately I decided to restore my original grill because I was not finding the correct width grill either retail or online in my initial searches. I've done a couple other ones in the house and they look fine.


Here's the grill after a couple coats of spray primer.  I'm getting anxious to put it back in its spot covering the big ugly hole in the living room wall.

Next I got out the table saw to cut up some oak lumber. Pictured below is the new window sill for in my kitchen above the sink.


Today I have to pick up a new blade for my band saw and I will finish the notch cut out on each end of the sill where it fits around the wall.  I was able to purchase window casing which I was working on earlier but I was not able to find the smaller foot pieces that fit up tight against the edge of the window frame so I ripped down some oak to make my own. Those are the four long strips on the right below.  I'll have to machine them down using the planer then round off the corner on the router table.


I love the smell of fresh sawn oak.
More to come!

Sunday, January 20, 2013

Domestic Update!


The recent lack of posts on the blog is because I have been busy planning, gathering materials and working on various small projects here around the headquarters.  I'm set to begin major renovations of both my kitchen and bathroom both of which are stressful and time consuming endeavors to say the least.  

I've finally got around to replacing the old three plug outlets with new ones and installing some attractive outlet covers and switch plates.


My house is a 1950's ranch style.  It was built in a time when building materials and workmanship was  still very high in quality yet building codes were pretty much standardized and close to what we have today making upgrades with modern components easy and simple.

Also by the 50's the wood trim used in finish carpentry had also been standardized to smaller dimensions and Yellow Pine seemed to become the wood of choice for trim probably due to its availability and low cost.  The shellacked pine trim in my house is structurally fine but it is old and dated.  I was recently browsing at the local home improvement store I an noticed that they now offered solid oak trim with the same profile cut as the original pine in my house.  I bought enough baseboard and foot to finish out the kitchen and bathroom once new flooring is installed.  I also got some casing to redo a window above the sink.


I'm using clear polyurethane to seal the wood.  Oak is one of my favorite hardwoods and it is my goal to one day replace all of the pine in my house with this wood.  Oak looks fairly plain when raw but once the clear finish hits it I love how it turns a peachy orange color and the grain pops.


Here's an extra pretty piece. Its got some tiger stripe like curly maple that's not often seen in oak.


I re-trimmed the kitchen and bath about 15 years ago when I installed vinyl flooring but at that time I couldn't find the matching profile in oak so I just used what was available.  I like the simple, spartan look of the original trim and I'm glad I've now found that same pattern but in oak.  

When I'm trimming out I use this miter saw to cut the pieces to fit.  It is a bit slower than a power chop saw but it does cut very accurate angles.  Since I do my own work I'm not under any kind of time constraint and I just enjoy the human powered element.


Over the years I've done electrical, plumbing, drywall and plenty of painting but one thing I never got around to was tile.  I figured the back splash between the counter top and the cupboards in the kitchen would be a good opportunity to learn a new skill.  

I wanted a lighter more neutral shade for the tile work since my counter top will be a darker gray color.  Looking around in the tile section I found this Turkish marble in a close out sale.  I like it because it is a natural stone cut to tile shape and not man made like the ceramic and glass tiles on the market.  These tiles have little pits and flaws but just like wood its a natural material and therein lies the beauty.


Here's a macro shot of the back of one of the tiles held up to a halogen light source.  The marble is semi translucent and has a pretty fiery orange color when back lit.


Another close up shot shows the crystalline growth of the minerals in voids exposed when the saw cut the slice. It looks like pita chips or some kind of cookie! 


I'll update more as I move along through the process. Stay tuned!


Tuesday, November 29, 2011

Shop Notes -- Skid Plate Installed


As I documented in my last post I like to ride the Scrambler off the beaten path.  Because of this I felt that adding a skid plate to my bike would be a good move to protect the leading edge of the crankcase and lower frame rails from road debris and stones picked up by the block tread of the front tire.  A secondary benefit is gaining a few more style points.  The skid plate just belongs on a bike of this type.  
  
Exposed front end before the installation


Skid plate installed - ready for action.


The plate does have six vent holes in front to allow cooling air flow so some crud will find it's way through.  Still better than no protection I found after the first hundred miles of mixed surface riding.

Mounting the Triumph accessory was a simple affair well within my limited wrenching abilities.  A mounting bracket bolts to the front frame brace onto which the skid plate attaches with four machine screws.  Before I started I reviewed the well written and illustrated installation instructions provided in pdf form by Triumph and kept the laptop on the workbench in case I needed to refer back to the guide.

A small challenge was centering the mounting bracket between the frame rails.  The bolt holes on the bracket are slots allowing for a bit of lateral adjustment.  The screw holes on the plate itself are round holes and do not allow any play.  Once the skid plate is mounted the bolts on the bracket are inaccessible.  If the plate is not centered the upper screws have to be removed and the lower screws backed out enough to allow the top edge of the plate to drop down clearing the two bracket bolts for wrench access. After about five tries I had the skid plate perfectly aligned with the two frame rails.  (I've long suspected I have a mild case of OCD)  


The same four screws can be later removed dropping the plate allowing access to the oil filter (black cylindrical object just aft of the plate). Some guy on the Internet did a "mod" on his plate by grinding away the material in the shape of a crescent allowing the oil filter canister to drop free without removing the skid plate. To me it's not a big deal to pull four screws. Besides I will occasionally want to clean and inspect the underside of the engine and frame rails so I see no reason to modify the part.


Wednesday, November 23, 2011

Shop Notes


The weather lately has been hit and miss and with the short days what little time I have spent with my bikes has been out in the garage catching up on some basic maintenance.  After 300 miles the Triumph Scrambler had finally accumulated a layer of road dust on the wheels and was ready for it's first chain lube.  

The cleaning and detailing of my two-wheelers is for me almost as enjoyable as riding them.  Getting up close and personal with the shiny bits on my machine not only enhances the pride of ownership aspect but can clue me in on patterns of wear or signs of impending component failure.  Obviously there is no wear to be found on a new bike but that won't stop me from sitting on an upturned bucket carefully inspecting every inch of my machine.  Checking fasteners, looking for leaks and basically studying the layout and engineering of the different systems.
   

Motorcycles and bicycles really have more in common than not.  The only real difference is how they are powered.  The first motorcycles were simply bicycles with a small motor bolted on.  As the engines got bigger so in turn did the frame and other chassis components to better handle the stresses of torque and vibrations of the gasoline engine.  Things have come a long way in nearly 120 years but some have not changed a bit.  Just like the rigs in the Wright Brothers shop my bikes have two wheels, a couple sprockets and a drive chain.

With my bicycles chain maintenance is a breeze.  I use a wax based lube that goes on wet but quickly dries.  This keeps the chain fairly clean because the wax flakes off as I ride taking the dirt with it.  Usually I will backpedal the cranks and apply the lube before each ride.  A process that takes all of about ten seconds.

The job is basically the same on the motorbike but it is a bit more labor intensive.  Due to the weight of the bike and absence of pedals one can't just pick up the back wheel and give it a spin to gain access to all of the drive chain.  Years ago when I first got into motorcycles I would scoot the bike forward a couple feet in the parking lot to expose a length of chain and apply lube.  Then repeat this about six times until I made it all the way around the chain.  By the early 1990's a center stand on a motorbike was no longer standard equipment but something that had to be purchased extra.  None of my bikes have ever had center stands so I've never had the luxury.  The Scrambler does have mounting points for a stand but I worry I wouldn't have the strength to rock the heavy bike back into the stand.  Besides I hesitate at the idea of bolting a big chunk of steel to the frame.  A mindset carried over from many years of pedaling a bike under my own power I'm sure.      


These days I use a hydraulic motorcycle lift to raise the wheels off the ground.  With the transmission in neutral and again perched on my bucket I can spin the rear wheel with two fingers and work that chain till it sparkles!  The lift is also indispensable for cleaning chrome rims and spokes.  None of that polish what you can reach, scoot forward and repeat business.  Spokes are a pain to take care of but they are old school cool and I wouldn't want it any other way.


On the motorcycle I use an aerosol based lube and cleaner for the chain.  These products are unlike the White Lightning that can be cleanly dripped onto the bicycle chain.  The spray can blasts it's contents everywhere.  To protect the rubber and wheel from over spray I cut a piece of plastic to fit up tight behind the sprocket and exposed length of chain completely shielding the wheel.  The material is inexpensive corrugated plastic from a sign shop.  I made a second piece so I have one shield for the cleaner and one for lube.  After I'm done I weight down the plastic pieces on the wood pile and put them away later after the distillates have evaporated.  A much better solution than a pile of oil soaked cardboard.


Sunday, August 14, 2011

Shop Notes -- Carbon Boom Installed


Yesterday afternoon after grocery shopping was done and the provisions stored away I had a couple hours free to work on the recumbent.  When I have new bike parts laying around I can't resist the familiar  siren song for too long and I just have to get my hands dirty.

HP Velotechnik with stock aluminum boom.
The first order of business was to cut the shifter cable and pull the front derailleur and chain out of the way.  The computer mount and cable also were removed and tucked safely out of the way.  The Truvative   crankset is held on to the bike by an 8mm self extracting bolt on the non-drive side.  My hex key is about six inches long allowing me to provide just enough leverage to loosen the fastener and free the crank arm.  A couple taps with a rubber mallet on the hollow steel tube that is the axle of the crank and the whole assembly slides right out.
   

Once the crankset is removed only the outboard bearing cups remain in the bottom bracket shell.  This is where my new Park Tool BB-19 proved itself indispensable.  The cups were pretty tight and I had to call on the services of one of my favorite tools the big 12" adjustable wrench to coax the cups from the shell.

Every so often I discover another advantage of the recumbent bicycle.  While straddling the main tube and facing forward the bottom bracket is in the perfect position for loading torque on the parts while at the same time holding the bike steady.  I found this experience much easier than working on the bottom brackets of diamond frame bikes stuck in the work stand.
   

Upon my initial inspection of the carbon boom while holding it up along side the bike I noticed that it seemed too long.  There is a slight bend in the main tube just forward of the head tube/steerer weld.  This bend only lets the boom be inserted so far.  Sure enough when I laid the two booms side by side the carbon tube was a couple inches longer.

The telescoping boom is a unique feature of many recumbent designs that allow the manufacturer to produce just one size frame and then the end user can customize the  reach by sliding the boom forward or aft.  Finally pinch bolts on the main frame tube are tightened securing the fit.

If I installed the carbon boom as is it would bottom out and place the pedals too far forward.  Now I had reached the point of no return and chucked up a cutoff wheel in the dremel.  I cut off the end of the boom just behind the tape as shown in the photograph.  I have to say I do like working with carbon fiber.  The high speed rotary tools cut through the material like the proverbial hot knife with none of the jerkiness, heat and exploding cutting wheels I experience when working with metal tubes.  I swapped the cutoff wheel with an abrasive drum sander and cleaned up the raw edges of the boom and it was then ready for installation.
  

Before I started I measured the distance the boom protruded from the main tube so I could set the distance of the new boom perfectly.  Notice the clever use of a V-brake style "macaroni" to guide the front derailleur cable up through the boom.  The work proceeded quickly downhill from here.  I attached the crankset in reverse order of dis-assembly, reattached the front derailleur, ran a new cable, screwed on the computer mount and was shortly off on a test ride around the block.

Good fun!