Wednesday, September 14, 2011

Shed News


After three trailer loads I now have 4,180 pounds of number 57 limestone spread out for the base of my shed.  It looks as if I will need another ton to raise the grade to the level I want.  The wheel barrow has proven it's effectiveness in transporting every last pound from the driveway back to the shed site.

A sharp eye will spot fossilized remains among the gravel.


This cool tool is a human powered lawn roller that came with the house when we bought the property.  I  use this 300 pound steel roller to smooth out the ground before erecting the swimming pool and flattening lumpy turf in the springtime after the ground has thawed.  I noticed that it works exceptionally well for compacting the stone of the shed base.  Walking on the rolled limestone feels more like a paved surface than a loose pile of stones.  After spreading out the final load of rock I will roll it some more and the result should be a very flat and stable foundation.

Things are progressing on schedule.  I will order more stone today for delivery on Friday leaving me the weekend to complete the final preparations before the shed's arrival next week.


Monday, September 12, 2011

American Tower Company


Because I am an amateur radio operator I am always interested in towers, antennas and other apparatus that sticks up in the sky that I encounter during my travels.  Not far from where I live I noticed a strange installation made up of six sections of tower each spaced few feet apart in a row paralleling a state route.  Adjacent the array of towers is a parking lot and a large industrial building.  I have been by this site many times and have only gotten away with a quick glance as I was always at the wheel and passing at 50 mph.

I've been meaning to stop and check out the towers and this past Saturday morning I had a little spare time so I grabbed my camera and headed to to the location.  I have long surmised that the tower stubs must be part of a sales display of a tower distributor.   


Affixed to each tower was a nameplate with a model number and nomenclature that read "American Tower Company"  Sure enough when I returned home and Google searched the name I found that the place was not just a distributor but the site of the actual manufacturer.  
American Tower Company
located in Shelby, Ohio makes everything from the lowly residential TV tower to gigantic commercial structures. 

American Tower Company product display

As it turns out the tower attached to my house has seen better days and I fear it will soon require replacement.  A couple factors have helped me to decide that when the time comes this may be the place where I spend my money.  First and foremost my money would stay in the area helping the local economy.  Just as important is the shipping issue.  Four ten foot sections would easily fit on my flat bed utility trailer for the short 15 minute trip home.

A nice tower is every ham's dream or at least it should be.  The antenna system is the make or break part of part of an amateur radio station.  My current tower works fine for hanging wires from but the top pipe that holds the mast is shot and cannot hold the weight of even a small antenna.  So if I wanted to experiment with any kind of directional antennae I will certainly have to put up a new tower.

Wednesday, September 7, 2011

Design on the Fly


As is often the case when I am busy on a project other problems always seem to come along requiring solving.  While I was building the retaining wall for my shed base I was realizing this space is going to hold a lot of stone.  Using the bending brake at work to form simple corner braces for the retaining wall got me thinking what else these custom made aluminum parts might be useful for.  

My utility trailer is a 2000 Nu Way (A Division of Martin Industries - Florence, AL) kit that I built myself ten years ago.  I have used this trailer for a multitude of tasks hauling sea kayaks, camping gear, dirt, mulch, stone, lumber, furniture, firewood and even a motorcycle or two.

My end use design of this 1300 G.V.W.R. trailer was modular in nature.  I used a 3/4" X 4' X 8' pressure treated plywood panel with rails screwed around the perimeter as a flat bed cargo deck.  The side frame rails have numerous holes where I attached U-bolts for cargo strap connection points.  On a second sheet of 4' X 8' treated plywood I constructed a double cradle rail system to support two 15' sea kayaks side by side. The plywood deck is secured to the trailer frame by six bolts making it fairly easy to reconfigure the trailer to another purpose.  The kayak deck went with the boats when we found that the structure swapped smoothly over  to the kayaks new owner's trailer.  These days my old trailer has mostly been relegated to more utilitarian duty and the cargo deck has remained bolted in place.

The rectangular wooden structure pictured in the photographs is the latest modular add-on I have come up with to make my loose cargo hauling tasks easier.  In the past ten years I have carried thousands of pounds of gravel on this trailer.  My procedure was to spread out a poly tarp over the trailer and then have a load of stone dumped onto the deck.  I would then gather up the corners of the tarp and tie up the whole package as if it was a giant bag of candy.  Just to be sure I ran a couple cargo straps across the bundle.  While this method worked it made me very nervous.  I took it real slow imagining the fiasco if the tarp broke open in a turn spewing gravel out on a quiet residential street.

While I was locked in mortal combat with maple tree roots in the backyard a plan materialized in my mind's eye of an idea I've decided to call the gravel box.  The next day I called my local lumber yard  and ordered four pieces of 2" X 12" treated lumber cut to a specific size.  Later that afternoon I fabricated the .063" aluminum corner braces and stopped by the hardware store for fasteners on my way home from work.

 Wyatt assisted with the final assembly.  He has noticed that his dad is always creating and building things and asks if he can help in some way.  Needless to say I go out of my way to make sure he is included. 

  Removal of the gravel box from the trailer is easily accomplished. After loosening the four turn buckles and removing the bolts and lock nuts all the parts can be broken down to individual pieces for storage.  The total cost of the materials for this newest revision of my handy utility trailer amounted to about $50 dollars.  The satisfaction derived from a little shade tree engineering -well worth it.

1,290 lbs

Monday, September 5, 2011

Labor Day


Shed Site Preparation Continues

My trusty ax purchased in a hardware store in Banff  Alberta, Canada 1993 for $15.

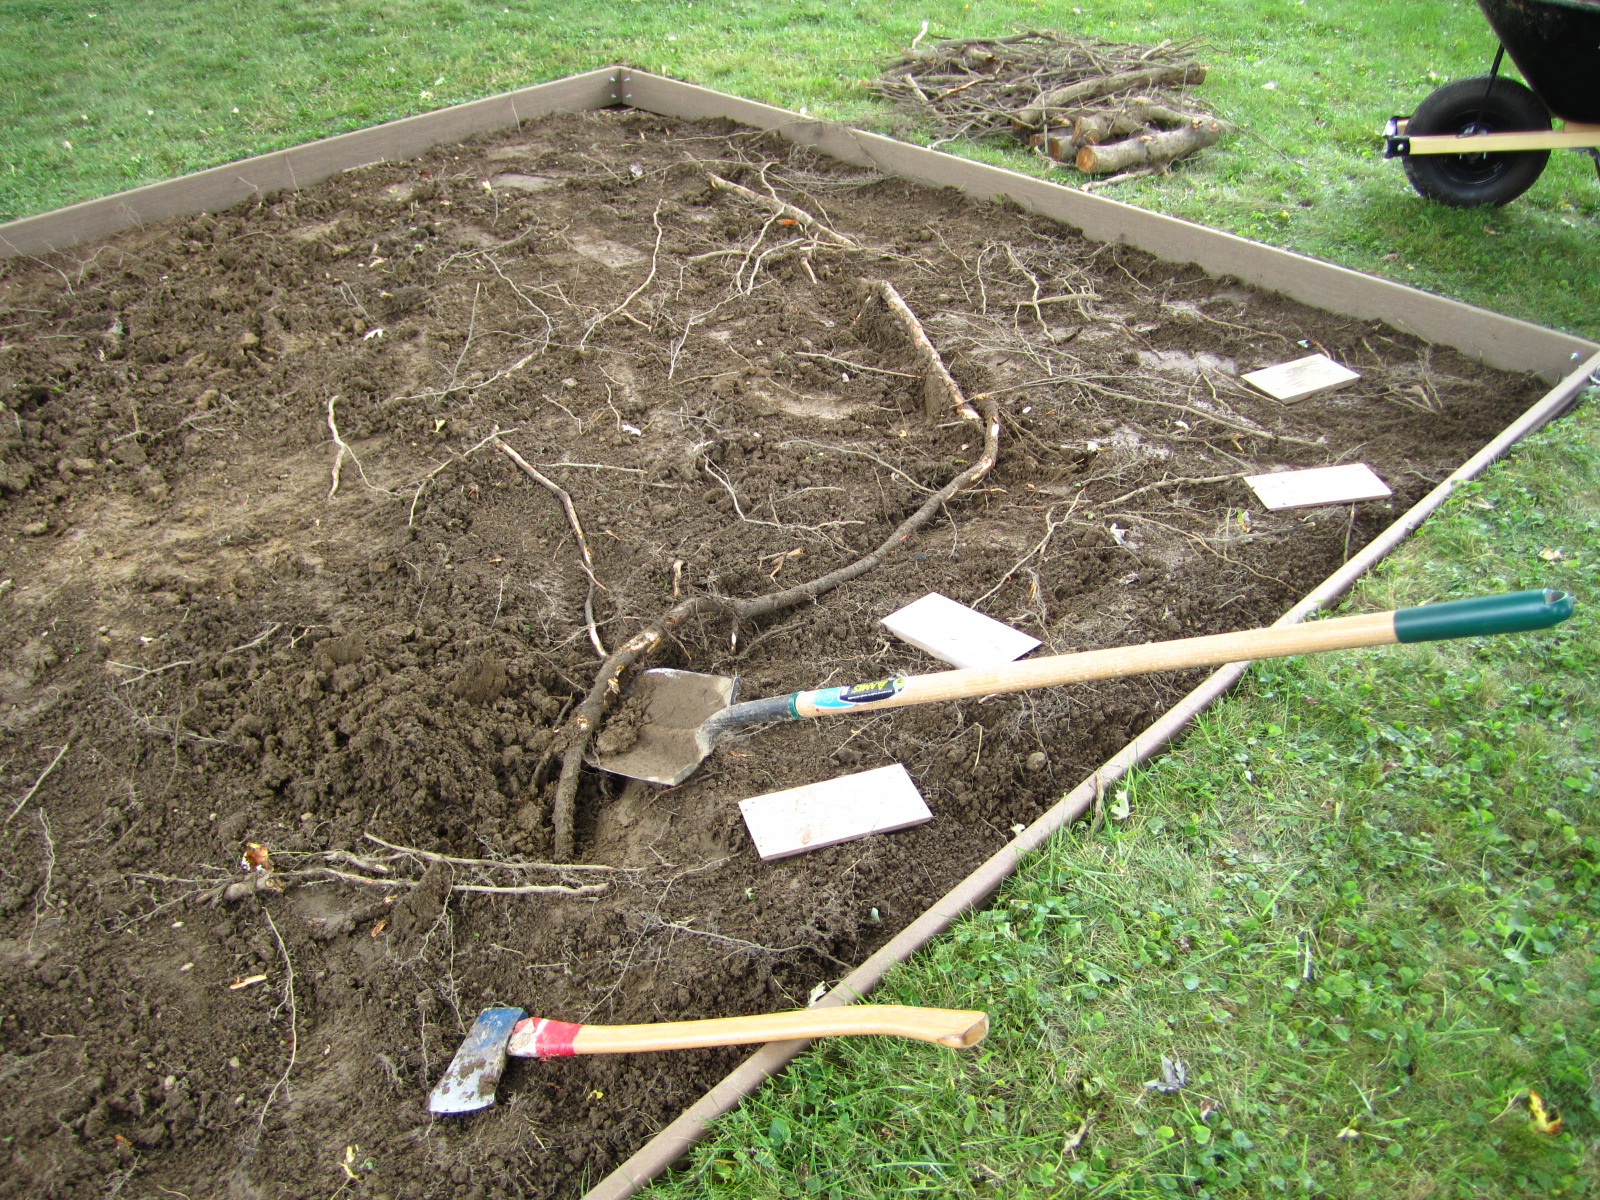
For us working stiffs who have projects at home Labor Day Weekend is aptly named.  I spent the second and third day of my shed project in an epic struggle with the elements.  On Saturday the temperatures soared into the upper 90's.  I toiled for seven hours with shovel and ax stopping only once an hour to drink a pint of ice water.

Two big Silver Maple trees grow on each side about 15 feet from my shed site.  I knew the ground would be intertwined with root networks from these two big old trees each with trunk diameters of 3 feet.

.060" Aluminum corner brackets
I fabricated these brackets at work and picked up some 1/4" zinc plated bolts and fasteners at the hardware store.  These will keep the corners of the retaining wall perfectly mated.  My experiment with this arrangement is to test how the composite decking material stands up to burial in a very moist area.  The boards are made of recycled wood fiber (sawdust) encapsulated in recycled polyethylene, the plastic that gallon milk jugs are made of.

The decking material is termite and rot resistant and carries a lifetime warranty by the manufacturer (when used as decking of course).  I've got a feeling it will work fine for my application.

If you've never had the pleasure of digging roots your missing out on a real treat!

I used a chain saw to facilitate the removal of a big 5" monster root.


By 4:30 PM I had all the roots finally removed from the space and the dirt excavated to a uniform 5 or 6 inches of depth.  Luckily the clay layer begins about 6 inches down so I should be in good shape providing a study and solid base for my new shed.  The next step is to fill the hole with gravel.  I purchase  limestone locally and use my utility trailer to haul it home.  The trailer has a capacity of about 1200 pounds and I am estimating I may need two or three loads.

Saturday, September 3, 2011

Shed Project Underway


Over the years I've amassed a small collection of bikes, tools, camping gear and other assorted equipment that simply no longer fits in a one car garage.  The car hasn't seen the inside of my garage in years.  That space is too valuable to waste on something as mundane as an automobile.  As a result circumstances have finally forced me into constructing a storage shed on the back of my property.  I want to get the lawnmower, rakes, shovels and other messy tools out of this prime real estate to make room for more important tasks.  

In the picture above is a 12 foot square area that my son and I dug by hand.  After clearing the tree roots to a depth of about 5 inches I plan to construct a retaining wall made of composite decking material to contain the limestone that will be the base of my shed.  If there is not a physical barrier between the gravel and adjoining sod the grass and weeds will quickly grow up through the stone.  

The structure will be an 8' X 10' shed very similar to my neighbor's in the background.  The 12' X 12' gravel base will give me plenty of room around the perimeter of the shed.  This part of the property is the low ground and always wet during the rainy season so I wanted to make sure the building is up high and dry.   

Unfortunately the project is not allowing me much free time for fun stuff like bike riding but fall is just around the corner and I am now forced to work under a time table.  It's not all bad though -digging, chopping tree roots with an ax and hauling around wheelbarrows full of gravel is a full body workout so the return on the investment is fitness.  Besides a little hard work builds character.

Stay tuned for more exciting shed news!

Tuesday, August 30, 2011

Pipes -- Peterson's System 303


One or two of my long time readers might remember I am a pipe smoker.  Pipes are one of my hobbies and as such something I don't get to enjoy as often as would like.  Moderation is key so I guess in this case it's not such a bad thing.  Over the past year I have determined that my favorite tobacco bowl is the Peterson's System Pipe 303.

This Premier grade System 303 is the latest addition to my small rotation.  I love the lighter stain and low gloss finish of this pipe.  The left side of the bowl and shank have beautiful straight grain brought out in dramatic fashion by a late August sun.

I have enjoyed a few half bowls in the pipe smoking slowly to gradually expose the briar to higher temperatures.  I don't have a set in stone method for breaking in a new pipe but for this classic Pete I am alternating between a favorite aromatic mixture and a brighter naturally sweet red Virginia and Turkish Izmir blend.

Un-Smoked!

The Peterson System pipe is a design over one hundred years old and still being produced and sold by the by the same company.  Amazing!  Just like my other 303's this one is a good smoker and a beautiful chunk of briar.   

Lastly the following pictures show close ups of the right side of the bowl.  This side of the pipe has birdseye and interesting character.


Sunday, August 28, 2011

Cycling Update


Late August signals the beginning of my favorite riding season.  The oppressive humidity and heat haze of summer give way to cooler temperatures and crisp star filled evening skies.  The changing of the fall foliage is still a month away but if one spends any time outside the signs of coming autumn are all around.  The chorus of crickets have reached a fevered pitch both day and night.  Woolly caterpillars make up a random slalom course for my bike wheels as they purposefully make their way across the road.  It's the time of year when I suddenly realize that soon I will be donning a pile of outdoor gear; gloves, hat, jacket, tights and wool socks just to go out for a bike ride.

Saturday I was feeling a bit restless and although there was numerous chores around the house that needed done I opted for a ride.  Cycling is my medicine.  Equally good for mind and body.

A steady breeze was blowing from the North-East so I decided on a route directly North. A long skinny loop where I could enjoy a tail wind to help push me back home on the second half of the ride.  I took my time enjoying the afternoon and took a few pictures.  An old country church of stout sandstone and brick was the backdrop for this blog post photo.

Bike:  HP Velotechnik Street Machine
Ride Time:  1:50
Distance:  25.6 miles
Average Speed:  13.8 mph
Max Speed:  25.9 mph
HP Velo Odometer:  1946.7 miles  

North Central Ohio countryside

--


I have also realized my new Motobecane Le Champion titanium road bike has not been out as often as I wanted this season so I have made it a point to get some rides in on 700c wheels before the snow flies.  Last Thursday after work I loaded up and took a short drive to the B & O Trail at Lexington Ohio.  My goal for the evening ride was a time trial to see where my fitness level was after many good rides on the recumbent this summer.  When I'm in the mood to hammer the Motobecane is my remedy.
  

B & O Trail 20 Mile Time Trial

Bike:  Motobecane
Ride Time:  1:10
Distance:  20 miles
Average Speed:  17.2 mph
Max Speed:  29.2 mph
Motobecane Odometer:  292 miles


Friday, August 26, 2011

Signals from Space


Amateur Satellites

I've heard about amateur satellites orbiting the Earth and read stories of hams out in their backyards waving antennas around scaring the neighbors.  Sounds like fun to me.  Curiosity about this interesting segment of amateur radio finally spurred me into action.  I did a bit of research about an amateur satellite "Arissat-1" launched earlier this year from the International Space Station.

At first glance one would expect elaborate equipment with specialized antennas and knowledge to be required to receive telemetry from a satellite in space.  This is not the case at all.  After I dug out my 2 meter FM transceiver and charged up it's dead batteries I now held in my hand a tiny satellite receiving station.  A programmable police scanner could also be used to tune in the satellites.
--
Finding the signals

On the Internet I found a wealth of information at the Arissat-1 website.  Most useful was a Pass Prediction Application where I entered my location (grid square) and the satellite I was looking for. The program calculated the times that the next 20 passes would occur over my location allowing me to hear the FM transmissions.  I printed out the page and clipped it to a clipboard for reference outside.

The first pass on my printout happened late in the afternoon while I was still at work.  I had just picked up Wyatt from school so he was standing by also.  I set the frequency on my little 2 meter rig to 145.950 MHz and opened the squelch control so I could hear the static as I had no real idea what I was listening for or how strong the signal would be.  About a minute into the predicted window the static suddenly dropped and a voice became audible getting louder and more clear.  I heard a female voice identifying the source of the transmission as amateur radio satellite Arissat-1 call sign RSO1S.  The next thing we heard was a greeting in one of 15 different languages followed by the telemetry data, technical stuff such as temperatures and battery voltages and current.  The last thing copied before the signal faded out in a rush of Doppler effect was SSTV or slow scan television.  The satellite was transmitting back to Earth a picture from one of it's on board cameras. 

Later in the evening we caught the satellite transmissions on it's next few passes spaced about two hours apart.  This was a fun little experiment that required no more than to walk outside and is another first for amateur radio station KD8JHJ.  After using the short and inefficient rubber coil antenna on my hand held I see now that the extra gain from a yagi antenna would be ideal for capturing the fleeting signals of these orbiting space travelers.


Under the "hardware" tab at the Arissat-1 website is lots of interesting information such as a Design Review that one doesn't have to be a rocket scientist to understand.  The points of the review are arranged into well constructed pdf documents.  It is truly amazing the amount of effort put into this project by dedicated hams and a great example of one of the many activities that fall under the subject of amateur radio.  One of the coolest hobbies on Earth and beyond. 


Tuesday, August 23, 2011

Kid Rock -- Saturday August 20th -- Noblesville, IN


This past Saturday my wife and I took a little road trip to the Hoosier State to catch a Kid Rock Show and opener Sheryl Crow.  We arrived at the venue near Noblesville, Indiana just as the sun was setting on a beautiful summer day.


We walked around observing concert goers before finding our seats at the start of Sheryl's performance as night fell around the amphitheater.


Our vantage point was not the greatest for photography but the music sounded excellent from this location.  After a shorter set of her more up-tempo hits to warm up the crowd Sheryl turned the stage over to Kid Rock and his unique fusion of hip hop and southern rock.  The music was loud and clear. Kid's show covered all the bases with lasers, pyrotechnics, pole dancers, whiskey and big American flags.


Kid and Sheryl are an unlikely pair but the chemistry works.


I've always liked Kid Rock but until now I'd never had the pleasure of seeing him and his band perform live.  He really sells his brand but if you pay attention it's readily apparent Kid Rock is a talented musician and showman.  He played the drum kit, a piano and electric guitars on several songs as well as singing lyrics at the top of his lungs.  What I found particularly impressive was a searing cover of Ted Nugent's "Cat Scratch Fever" with Kid playing the iconic opening licks on the guitar.  Would I go to another Kid Rock show? Certainly. 

Lastly I have to give credit to my wife LeeAnn who drags me (willingly of course) all over the Mid West on her Sheryl Crow adventures.  If it wasn't for her I probably would only leave the house to ride my bike. 


Friday, August 19, 2011

Friday Ride


Local Loop

(Motobecane)
Ride Time:    1:34
Distance:    24.1 mph
Average Speed:    15.1 mph
Max Speed:    29.9 mph
Motobecane Odometer:  272 mi

Nice evening for a road bike ride.    


Thursday, August 18, 2011

News from A.R.S. KD8JHJ


It's been a great summer.  I spent some quality time working on and riding bicycles. As a family we had some adventures and saw a few new and interesting places.  I've gotten back into reading with a vengeance since I got my Kindle ebook. And last but not least the old 9 to 5 that uses up the rest of my free time has kept me busy.  All this has brought my radio-activity to very low levels but that doesn't mean amateur radio is not front and center in my mind.  Ham radio is a great thinking man's hobby.  Electronics, antenna theory, wave propagation and history are just a few of the related subjects that can keep an idle mind firing on all cylinders while away from the shack.

I still get on the air when I can and as the summer winds down and turns to fall the shortening days will curtail my outdoor activities and leave more time for radio pursuits.  On the 14th of August the SKCC Week End Sprint was held.  I always try not to miss this event so I got on the air with my straight keys and handed out a few numbers.  The most notable contact during the sprint was a 2,080 mile cross country connection with Jake KK6L, who lives outside San Francisco, California.  Jake is a very active and enthusiastic ham who is 9 years younger than me.  There is a few of us younger guys out here passionate about radio.  We will keep the brass pounding tradition alive.

KD8JHJ August SKCC WES log


7.056    W3OKC    Pennsylvania
7.053    W1LVT    Vermont
7.057    K8EE    Ohio
14.048    KK6L  California
14.053    N5RKD    New Mexico
7.052    K4ZGB    Alabama
7.053    K4BAI    Georgia
7.113    N0UMP    Missouri
7.050    KI0I    Missouri
7.048    W9DLN    Wisconsin
7.055    W4FOA    Georgia
7.053    N4RE    North Carolina

--

On the digital side of the radio desk

Unanswered Feld Hell CQ's on 20 meters
 In my last ham radio post I mentioned that I was wanting to make some DX contacts using my favorite digital mode Feld Hell.  When I have the station fired up I usually send out some CQ calls to see what happens.  Most of the time I get no responses.  Hellschriber is an obscure mode with a smaller following than the more common digital modes on the airwaves like PSK-31 or RTTY.

On the 21st of July I was parked on 14.080 MHz and after my second CQ call I was shocked to see SP5APR, the callsign of a gentleman named Stan returning my call.  From 4,569 miles away in Warsaw, Poland Stan copied my Feld Hell signals and reported them 599 and perfectly readable.  Fine Business indeed.

--

Last night I was sitting at my desk stamping some envelopes for QSL cards.  If I am not monitoring the CW frequencies for Morse code I like to set my rig to the PSK-31 "watering hole" on 20 meters.  This is a great way to see how propagation is working.  PSK stations are operational nearly 24/7 these days on 14.070 MHz.  My software (fldigi) has a feature called "psk browser" that when enabled tracks and decodes all the signals in the 3 KHz  passband of the receiver in a seperate window.  At a glance I can follow up to as many as ten or twelve QSOs all happening at the same time.   The program will highlight the incoming text in red if a certain key word or phrase like CQ CQ CQ is decoded.  Clicking on the text with the mouse will automatically tune the software to that exact frequency and with another click my reply is transmitted digitally out into the ether. 

I noticed while watching the psk browser the station IR2ITA advertising a special call.  He was working other European stations but his signal was strong and providing nearly perfect copy to my lowly wire strung outside to the tree in the backyard.  I assumed "special call" meant special event station so I waited for an opening and clicked a transmission in response.  Franco in Italy got my signal solid and I now have another unique special event station in the log.  I posted a screen shot of our actual QSO under the IR2ITA qsl card image below.  


KD8JHJ in qso with IR2ITA using PSK-31 digital mode


--
Earlier this week I was reading the SKCC websight and I noted an announcement by Stan, WB2LFQ.  Stan planned to operate a special event station as a single op QRP using CW only (Morse code) commemorating the 42nd anniversary of the Woodstock Music Festival in Bethel, NY.  What a cool special event I thought.  I am a huge music fan and many of my favorite classic rock acts were new up and comers that performed at that legendary 3 day show.  I saw that the event was underway so I set my receiver to the specified frequency on 40 meters.  Soon enough I heard the "CQ CQ de W2S" special call.  The signal wasn't booming in but it was perfectly readable.  5 watts, 500 miles -No problem!  I exchanged info with Stan at a crisp 20 words per minute using my ZN-9A paddles.

I've already sent off my SASE 9.00" X 12.00" envelope and I am looking forward to seeing how Stan designed his unique special event certificate.  The info for the event is still posted on QRZ.com under W2S.  Stan posted the log from the event on his site Here. I found my call in this log contact number 23 out of 155 stations worked by Stan over 30 hours of operation.  Pretty impressive for a one man qrp effort to say the least.

I've read lots of articles and blogs written by experienced hams who describe how our tastes in different aspects of the hobby change over time.  I don't doubt this but for now catching these one-of-kind special event stations has become my favorite radio activity.

Sunday, August 14, 2011

Shop Notes -- Carbon Boom Installed


Yesterday afternoon after grocery shopping was done and the provisions stored away I had a couple hours free to work on the recumbent.  When I have new bike parts laying around I can't resist the familiar  siren song for too long and I just have to get my hands dirty.

HP Velotechnik with stock aluminum boom.
The first order of business was to cut the shifter cable and pull the front derailleur and chain out of the way.  The computer mount and cable also were removed and tucked safely out of the way.  The Truvative   crankset is held on to the bike by an 8mm self extracting bolt on the non-drive side.  My hex key is about six inches long allowing me to provide just enough leverage to loosen the fastener and free the crank arm.  A couple taps with a rubber mallet on the hollow steel tube that is the axle of the crank and the whole assembly slides right out.
   

Once the crankset is removed only the outboard bearing cups remain in the bottom bracket shell.  This is where my new Park Tool BB-19 proved itself indispensable.  The cups were pretty tight and I had to call on the services of one of my favorite tools the big 12" adjustable wrench to coax the cups from the shell.

Every so often I discover another advantage of the recumbent bicycle.  While straddling the main tube and facing forward the bottom bracket is in the perfect position for loading torque on the parts while at the same time holding the bike steady.  I found this experience much easier than working on the bottom brackets of diamond frame bikes stuck in the work stand.
   

Upon my initial inspection of the carbon boom while holding it up along side the bike I noticed that it seemed too long.  There is a slight bend in the main tube just forward of the head tube/steerer weld.  This bend only lets the boom be inserted so far.  Sure enough when I laid the two booms side by side the carbon tube was a couple inches longer.

The telescoping boom is a unique feature of many recumbent designs that allow the manufacturer to produce just one size frame and then the end user can customize the  reach by sliding the boom forward or aft.  Finally pinch bolts on the main frame tube are tightened securing the fit.

If I installed the carbon boom as is it would bottom out and place the pedals too far forward.  Now I had reached the point of no return and chucked up a cutoff wheel in the dremel.  I cut off the end of the boom just behind the tape as shown in the photograph.  I have to say I do like working with carbon fiber.  The high speed rotary tools cut through the material like the proverbial hot knife with none of the jerkiness, heat and exploding cutting wheels I experience when working with metal tubes.  I swapped the cutoff wheel with an abrasive drum sander and cleaned up the raw edges of the boom and it was then ready for installation.
  

Before I started I measured the distance the boom protruded from the main tube so I could set the distance of the new boom perfectly.  Notice the clever use of a V-brake style "macaroni" to guide the front derailleur cable up through the boom.  The work proceeded quickly downhill from here.  I attached the crankset in reverse order of dis-assembly, reattached the front derailleur, ran a new cable, screwed on the computer mount and was shortly off on a test ride around the block.

Good fun!