Thursday, December 25, 2014

Christmas Ride on a Brooks B67


I took advantage of empty streets for a little Christmas afternoon ride to test out a new Brooks B67 Aged saddle that I have just gifted to my beloved General Purpose Bike.  I first heard about Brooks saddles many years ago from a co-worker who has been riding for 40 years.  Once he tried to pawn off an old black B17 but being caught up in the mountain bike racing scene I laughed it off and have been making fun of the old leather saddles ever since.  

Well I've gotten older and with age comes wisdom.  One of my favorite bike bloggers BikeSnobNYC has been riding brooks saddles and I have to give him credit for convincing me to finally give the British saddle maker a try.  Because the recent handlebar change to the Bosco bar resulted in a much more upright riding position I knew I needed a wider saddle for better support. 
  

On the Brooks website I was amazed at the huge line of saddles offered by the company.  After perusing through the Brooks lineup I easily determined the B67 saddle would be the way to go.  
  

I went with the "Aged" saddle mainly because I love the look of the natural cured leather without any added dyes or coloring.  Brooks says the Aged saddles are comfortable from day one and I have to agree. After fine tuning the tilt of the seat I am amazed at how comfortable it really is.  


After an hour or so on a regular narrow racing style saddle I always notice a sting that causes me to have to constantly shift my position to relieve the discomfort.  Today I spent an hour on the B67 and I noticed no sting at all. 


The saddle does pivot a bit on the big springs but I'm quickly getting used to the feeling and don't find it offensive at all.  I've purposely hit some of the bumpy streets around town that I normally avoid and the saddle makes a huge difference. 


With the handlebar change and new saddle I've made quite a change to the bicycle and it's going to take some more riding to fully realize the effect.  It looks like the weather is going to hold out so with temperatures climbing into the upper 40's I plan to head to the bike trail for a longer ride tomorrow.  Just as the comfort factor of the bike has increased substantially I think the looks have improved as well. The bike has really taken on a classic look.  Modern components make the braking and shifting flawless and now the improved human-bike interface provide by the new bar and saddle have made the Ti GP bike into one sweet ride.


Friday, December 19, 2014

The Bosco Bar


Ten years ago I built up my Titanium General Purpose Commuter/City Bike (TGPCCB) and it has served me well.  Over the years I've messed with different drive train configurations and little tweaks here and there but one thing that remained constant was the original handlebar.  Because the frame was intended as a mountain bike I naturally mounted it up with a flat mountain bike style bar.  While I'm usually pretty good at thinking outside the box I never gave my handlebar much thought and just put up with the uncomfortable bent over position the straight bar.

Many recumbent advocates will say that a recumbent bike makes a fine commuter but I disagree. In my experience with lots of starts and stops and busy streets I believe the upright safety bicycle configuration makes the most sense as a city/commuter ride.  On the open road that's another the story.  Of course in that application the recumbent outshines them all. 

Back to the subject of this post.  The last couple years I have been commuting to and from my day job more often than ever before.  My trips around town are usually very short amounting to 20 minutes or less.  While that is not a long enough sitting to incite the aggravation of a bent over riding position the flat bar slowly became my bike's least favorite attribute.

One of my favorite luminaries of the bicycle world is Grant Petersen who is a great author and proprietor of the amazing Rivendell Bicycle Works.  As I've gotten older and more retro-grouchy I've come to appreciate the idea that bicycles can be rolling versions of artistic expression and vehicles of fun instead of just performance oriented machines derived from the latest and greatest of the racing world.  Grant's philosophy has really changed my thinking on how I ride and how I tailor my equipment to match the riding style. 

One day while I was wandering around the Internet I came across a handlebar called the Bosco Bar.  I liked the old school euro city bike look of the thing and right away I thought that's what I need for the Ti GP.  Upon further investigation I discovered this bar was the brainchild of Mr. Petersen and manufactured by Nitto of Japan.  Built in a few different widths and versions made of chromoly steel and aluminum the bars are very high in quality and finish.  Established on February 11, 1923 in Tokyo; Nitto has built a fine reputation as one of the worlds oldest bicycle component makers.

Unfortunately the more affordable steel bars were sold out and on back order and impatient as I am I settled instead for the aluminum version which was in stock.  The good folks at Rivendell had the bar boxed up, across the country and to my doorstep in five days.  Thanks guys!

I sourced a new cable kit and a thumb shifter because the old cables and jackets would be way to short for the reach of the new bars.  
  

The modern Shimano trigger shifter I was using for the 1x9 drivetrain did work flawlessly but I thought the look would be off on the Bosco bar so I relegated it to the spare parts bin.  I remember two of my first mountain bikes back in the 1980's had thumb shifters and I always loved them so it's great to finally have a thumbie perched back on my bar.


The Bosco only comes in silver polished alloy or steel so I had some decision making to do in keeping with the black on Ti theme of my bike.  I thought about simply roughing the bar up and going at it with some flat black rattle can but the Nitto is just too nice for that.  Another idea I had was to slip on some black shrink tubing over the bars to get a uniform utilitarian look.  Ultimately thanks again to the Internet I found out the cool kids were wrapping their bars with old fashioned cotton bar tape. 


I stopped short of getting out the shellac but I did finish off the end of the wraps with some waxed linen serving from my archery supplies.  Very sharp if I do say so!
  

Here's the cockpit view of the controls.  A little dusting of snow for the morning commute and just right in the holiday season.

Per the instructions I used my calibrated eyeball to put 6 degrees or thereabouts of tilt to the bars for optimal comfort and boy do they deliver.  I've only ridden about an hour so far on the new bars but I am very impressed with the feel of the Boscos.  Before mounting them up I was a little concerned about tiller effect with my hands back a bit of the steering axis but the control and reach is perfect. The bike feels more natural now than it ever has.  With a longish 23 1/2" top tube I believe the Bosco clamped up in a 110mm stem is about as close to perfection as the bike is going to get.


With the old flat bar and its more aggressive leaned over riding position the WTB saddle was acceptable even on longer rides but now sitting nearly bolt upright I'm thinking a seat upgrade may be in the future.  I've been eyeing those fancy Brooks leather saddles with the wider seat and springs underneath and that just might be the ticket.
  

Tuesday, December 2, 2014

TVM Iron Pennsylvania .45 Caliber


As a firearms enthusiast I've long been interested in black powder guns.  My first experiences with black powder came in the mid 1990's with the growing popularity of the inline ignition rifle used for hunting.  Striker fired weapons with the percussion cap positioned on a nipple directly behind or "inline" with the breech area of the rifle provide for a quick instantaneous ignition of the powder charge.  While well suited to big game hunting the modern muzzle loader to me just seems to miss the point.

Being a student of history it didn't take me long to look backwards and study the origins of early firearms.  My first traditional muzzle loader was an Italian made Pedersoli Rocky Mountain Hawken rifle in .54 caliber which is representative of designs dating to the mid 1800's.  That rifle I've talked about before on this blog.  The Hawken is a fine side lock that uses percussion caps as an ignition source but my curiosity eventually led me to the flint lock rifle.  The flintlock was the predecessor of the cap lock using the strike of flint against a steel frizzen to shower sparks into a pan containing a small amount of black powder.  This action ignites the main charge in the breech through a small orifice in the side of the barrel.

After attending a few living history events and watching primitive flint lock rifles and muskets in use I knew I had to get in on this action.  I read some forums and perused various catalogs and websites of rifle builders before I settled on a maker for my very first long gun commission.  

Choices are pretty slim for left handed factory produced rifles so ultimately I decided on a semi-custom by Matt Avance of Tennessee Valley Muzzleloading.  TVM has a great reputation among hunters and shooters of producing reliable accurate traditional long guns.  A couple of factors led me to go this route.  First and foremost I like buying American made firearms.  Secondly by purchasing from a small builder I would be able to specify some of the rifle's features to fit my needs and tastes and lastly I knew I would be able to count on the rifle's lock work to be set up and timed for perfect ignition.

Last October I made a deposit which got me on the waiting list and I went about other activities through the winter and tried to keep my mind off the flint lock. Finally I got an email about mid summer saying that Matt was ready to begin my rifle.  After confirming the particulars it would take about four weeks until the build was complete and ready to ship.

What first got my attention about the Iron Pennsylvania was the name itself. "Iron" means all of the gun's furniture or metal parts are made of steel instead of brass which was common in colonial America.  Locks have always been made of steel and in the early days they were imported from England.  Other parts such as trigger guards, butt plates, nose caps and ramrod thimbles were fabricated from brass by colonial gunsmiths because it was easier to work with and readily available.  The brass fittings are fine and period correct but I like the more subdued look of all steel furniture on my guns.  Since I'm not a history reenactor I'm not concerned with the small details of historical correctness.  I just wanted a rifle that loosely resembles a long gun of the late 1700's.        


I chose American Walnut for the stock. Finished natural with only a clear oil shows off the true color and beauty of the wood.  Walnut has long been a favorite material for gun stocks and I think it just looks great so there was no question of my choice.  Traditionally maple was most often used because it was easily sourced locally.  Even in early America figured maple with tiger stripe grain patterns was highly prized and many original guns still exist proving the popularity.


The metal of modern firearms are commonly polished and "blued" or rendered black by a chemical process.  Before bluing was the standard primitive rust-browning techniques were used to seal and finish off the surface of metal parts and barrels. This browning is the look I chose for all the furniture.


The barrel is 42 inches long and the bore is .45 caliber.  I chose .45 because it is a middle of the road size small enough for accurate target shooting and big enough for whitetail deer if I ever get the urge to put some meat on the table.  The barrel is 13/16" across the flats.  .45 is the largest caliber made from this size blank so while it looks cumbersome and heavy the rifle is surprisingly light and shoulders like a dream.

Another feature of the barrel I've come to appreciate greatly is round bottom rifling.  This type of rifling is another throwback to older times.  It works perfect for muzzle loaders by making it easier to clean the grooves of dirty carbon and powder residue after a shooting session using authentic black powder.  All modern guns have sharp cornered grooves but this is not that big of problem with cleaner burning smokeless propellants in use today.
   

The first Saturday after I received the rifle I headed to the range with great expectations.  The only thing I had do in preparation besides a quick swab of the bore was open up the groove slightly in the rear sight.


Did I mention the Iron Pennsylvania is long gun? Overall length is 57-1/2" or nearly 5 feet long!  The 13-1/2" length of pull puts the trigger in perfect reach when shouldered and with my off hand support arm locked against my torso the barrel holds rock steady and the long sight radius is amazing. 

Here's a good side profile shot captured by the Road Queen that shows how long the gun really is:


What a blast!  Firing the flint lock is unlike any shooting I've ever done. It also is some of the most fun I've ever had playing with guns and I've played with a few.  The biggest thing to get used to is the bright flash and smoke that erupts from the pan when the hammer falls.  My first few shots I was blinking my eyes instinctively but soon I was keeping my eye riveted on the front sight blade and began to see the yellow flash.  


I love the challenge that shooting the flintlock presents.  There is a very slight delay between the flash and the bang and recoil when the main charge ignites.  A rifleman must put considerable effort into concentrating on the front sight throughout the firing sequence keeping the rifle on target and ignoring the flash and smoke from the pan.

I've been shooting muzzle loaders for a long time so loading and handling procedures are very familiar.  I used that experience getting reading for my first shot with the new rifle.  Standing at 25 yards from my target and after setting the trigger I slowly squeezed off the shot:

Bulls eye! 25 yards offhand


The above target I shot from a sandbag rest at a target posted 50 yards out.  The middle black region of the target (8-ring, 9-ring and bulls eye) forms a six inch circle.


This target I shot standing offhand with the target also posted at 50 yards.  At least for me the accuracy is similar between offhand and bench rest.  While I'd like to claim this is due to my excellent marksmanship skills I think the credit really belongs to the rifle and the huge sight radius afforded by that long barrel. 


One day I took a trip to the club and set up on the 100 yard range.  With the stock resting on sandbags the front sight completely covers the six inch bulls eye of the target.  It looks like quite a spread but in reality that six inch bull is just a speck when viewed down range.  That I managed to keep all eight rounds I fired on the paper 100 yards away with iron sights and that big flash going off inches from my face I'm pretty impressed.  With some more practice and experimentation with loads and patches I think I can shrink that group down.
  

Patches for round ball shooting come in various thicknesses.  To check performance of a chosen patch and load inspecting shot patches is a good idea.  The patches can be found about 20 feet out from the muzzle laying on the ground.  A patch that is too thin may have burn holes or blown to bits altogether.  The job of the patch is to create a gas seal between the ball and the lands and grooves of the rifle's bore.  The patch also has to grip the rifling securely so as to induce a spin to the projectile as it travels down the bore.  If a patch is too thin it could tear out and not follow the rifling's grooves resulting in poor accuracy.  

I tried patches of several different thicknesses and indeed the thinner ones did have holes and burnout even though accuracy was good.  Ultimately I settled on .018" thick pillow ticking patch material which are shown above.  They show just a slight charring in the shape of the bore. 


Of course every round fired I cast by hand in my backyard crucible.

My son accompanied me to the range a few times and tried his hand at the Iron Pennsylvania.  In his usual style he's a dead eye and was very impressed.  Interestingly he told me this fall they were studying the American Revolution in history class at school.  I was so happy I could give him the opportunity to bear an arm like those used by citizen patriots over two hundred years ago when forging out a new nation.  I'm sure it added some color to his studies that one just can't get from a book.


Monday, November 17, 2014

Winter Woods Walk


The first winter storm of the year swept into the Ohio valley with a vengeance last night.  When I got up this morning I found all covered in a blanket of white.  Most people moan and groan and complain that they're not ready for the cold. Not me I love the changing seasons and planned my day to get out and enjoy it.

I thought about cross country skiing but the ground is still a bit soft in places and the snow was very heavy and wet. Sometimes those conditions can make skiing more of pain when the slushy stuff sticks to the bottoms of my boards. So I just put on my pack boots and decided to go for a walk.

I tossed my camera in my backpack as I always do but with the gray stark scenery I didn't figure I would get any nice shots.  


To my surprise though, after a half hour into my hike the storm clouds abruptly cleared out from the west and an intense sunshine electrified my surroundings.  It was really amazing like a light switch had been thrown.


The Clear Fork went from cold steely gray to deep blue.  Truly a vibrant contrast to earlier in the day.  I spent a few hours in the woods enjoying the day and our first winter snowfall.  Once again I'm glad I threw in the camera.  It always seems the good shots come around when they're not expected but today I was ready.


Monday, October 13, 2014

Dysart Woods


Eureka Timberland
 A useful tool I've found for exploring my home state is the Ohio Atlas & Gazetteer by Delorme.  I was looking at this book the other day and I noticed a place listed in the directory of Unique Nature Features called Dysart Woods.  I'm always interested in visiting unique places so I mentioned it to The RoadQueen. The main logistical problem we would have to accommodate is the roughly three hour drive to the location in southeast Ohio not far from Wheeling, West Virginia.

With such a long drive the outing was more than I wanted to deal with in a one day trip so The RoadQueen got busy with planning the route, Inventorying and staging the camping gear.  I decided to use the opportunity to field test a new tent I bought that is much smaller and lighter than my other tent.  My old dome tent was worn out and not doing much good at keeping out rain so it was time to for replacement.  

I've pictured the Cabela's Extreme Weather Tent in this blog that I use for extended trips and Field Day operations in amateur radio.  That is an awesome tent but at nearly 80 pounds it's not the most convenient for small car camping. In the future I plan on doing more solo bike adventures and also tagging along with The RoadQueen to some of her horseman's camps so I needed a good small weatherproof shelter that's easy to move and quick to set up.  

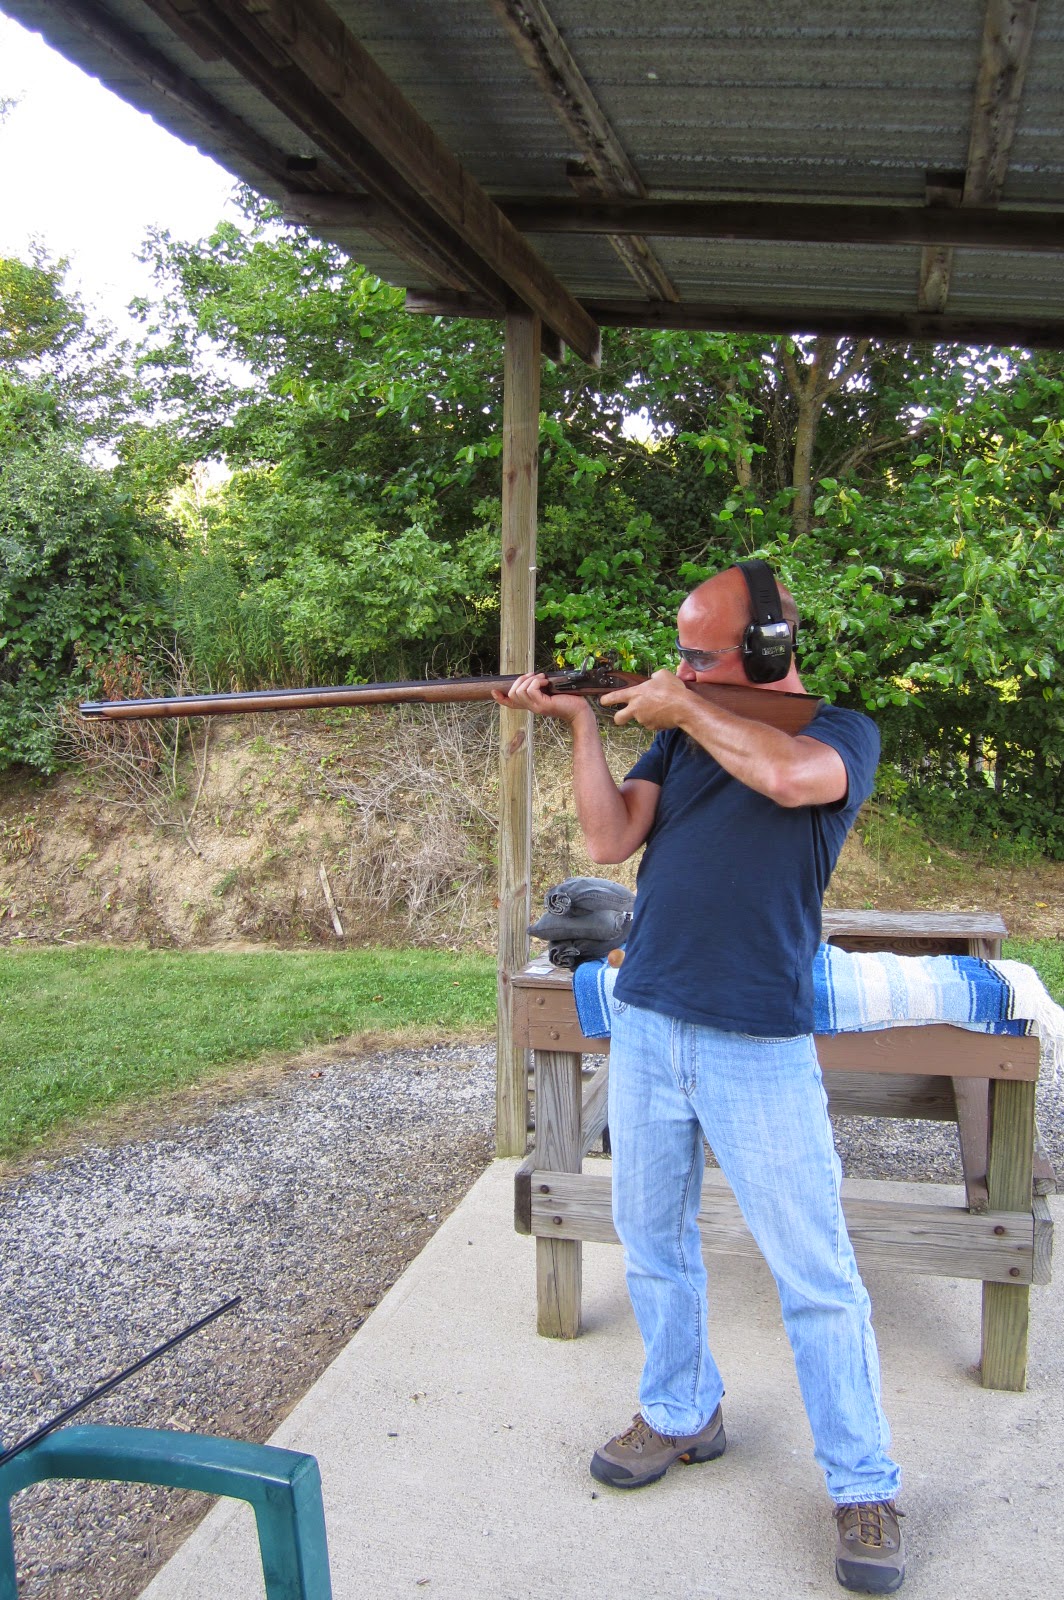
Instead of a new dome I settled on a more traditional A-frame style tent by Eureka called the Timberline Outfitter.  It's not a backpacker by any means at ten pounds but the tent does have a long and favorable reputation among the Boy Scouts of America.  If it holds up to the intense use of the Scouts I'm sure it will more than suffice for my occasional outings. 

We chose Barkcamp State Park as our base of operations which is only a few miles north of Dysart Woods.  We left Friday after I got home from work and arrived at the State Park at Dusk leaving just enough time to set up our camp.  The skies were overcast and it began to sprinkle as we assembled our gear and slowly shifted to a light rain as the evening progressed.  Nothing like a steady all night rain to test a new piece of gear and I'm happy to report the Timberline passed its trial by fire perfect.  We slept dry and comfortable on our cots and found the interior of the tent dry the next morning.     


The sun was out first thing and quickly dried up the surroundings from the previous night's showers.  I absolutely love camping in the state parks after the summer season comes to a close.  Park use drops significantly and we were one of only a handful of campers utilizing the place.  Also the changing leaves of autumn make it one of the best times of the year to spend some time outside.


Here's a piece of gear I've been using for a while now at my camp for brewing coffee in the morning. It is called a French Press and in my opinion makes the best cup o' joe out there.

After breakfast we left the state park and made a short trip along secondary routes and quiet country roads of Belmont County towards our objective Dysart Woods.  


I've found all parts of Ohio to be varied and beautiful but I always love returning to the hills of southeast Ohio.  Following the signs we shortly pulled up along this house that once belonged to the Dysart family who lived on this land for several generations.  What makes this place unique is that the family managed to keep a 50-acre tract of their land as untouched forest never allowing logging or other destructive land use to occur.  The result of this today is the largest known remnant of original old growth oak forest in southeastern Ohio.


Ohio University in cooperation with The Nature Conservancy has taken on the responsibility of maintaining and conserving this special natural resource.  OU uses the forest as a natural laboratory for researching and studying the dynamics of a mature oak ecosystem.  As an added benefit the public is encouraged to visit the park and walk its foot trails that wind among the forest giants some as old as 400 years.

Up the road a bit from the farmhouse we entered the woods and pulled into a marked parking area where we found a kiosk and a trail map to guide us along the two mile loop.


It was a chilly morning and the air was fresh and clean but soon the sun was warming things up and casting down its golden light into the forest.  We couldn't have asked for a better day for walk in the woods.

Just into the walk the surroundings looked like any other deciduous forest except for every so often when we came upon huge trees towering far above the trail.


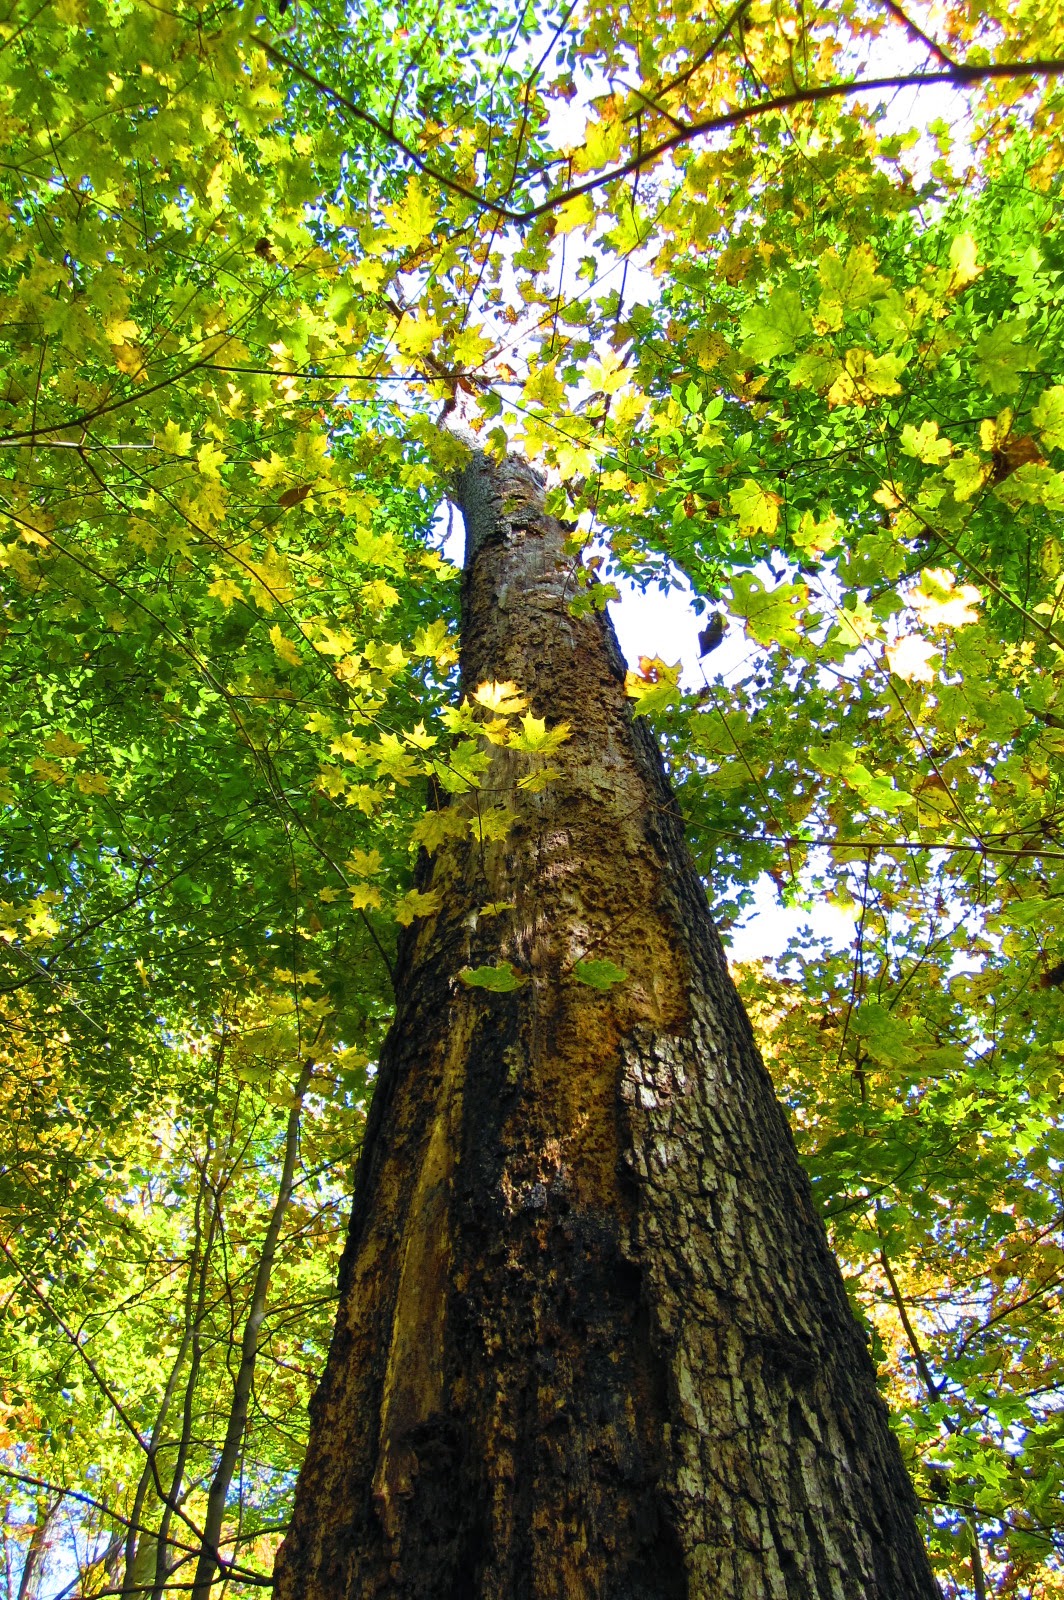
Here's a white oak giant whose branches don't even start until well above the lesser trees of the understory.  I couldn't help but just stand there in awe of  this living thing that has existed since before the USA was even established. 


Size is not always an exact indicator of great age.  The mass of a tree can vary due to species and local conditions.  Here is me in the frame for scale. These are some massive trees.


The trail map we found at the trail head outlined some of the characteristics that indicate that a forest may be "Old-growth".  We were able to observe many of these criterion on our hike.  Here long ago a tree fell over and heaved up its root mass leaving a pit.  Slowly the root ball decayed and the soil remained in a mound.  This is called Pit and Mound Topography. 


Standing dead timber and downed logs are also definite clues of an old growth forest.  We saw lots of  dead trees standing easily a hundred feet into the air and many laying on the forest floor in various stages of decomposition.


The cycle of life and dependency of one kind of organism on the other was evident everywhere. To me it never gets old wandering around in the woods and witnessing with my own eyes the wonder of nature.


At one point the trail led us along an open hillside on the edge of the forest where we could look out to the surrounding hills.  It is hard to imagine that at one time most of the eastern U.S. was covered with endless forest.


Other trees we noted in the woods were plentiful maples and huge beech trees with their smooth gray bark. Cherry, black walnut, hickory and tulip trees also thrive in the area.


Above is another characteristic of an old growth tree.  Notice the at the base of the tree how the trunk widens out.  This is called the buttress.  A mature tree needs a sturdy base to remain in place.  Imagine the forces of wind during a storm that act upon a 140' tall tree.


I've not yet made it out west to see the great redwood forests but until then I think I can safely say these old boys are the oldest living things I've had the good fortune to meet in my short time on this Earth.

On the way back from Dysart Woods we toured a bit more of picturesque Belmont County. 


Arriving back at camp we got busy getting a fire going in preparation for a steak dinner and campfire potatoes cooked over an open hardwood fire.  We enjoyed the rest of the day relaxing and admiring the golden sunlight and colorful leaves around the campground. And later as night fell we stoked up our fire watched the stars come out and a three-quarter moon slowly raise up clearing the trees while a pack of coyotes yipped and howled in the distance.


Camping is a lot of work and it takes a bit of preparation to make it work smoothly but I wouldn't trade the experience for anything.  Spending a few days and nights outside of four walls and a roof cleanses the spirit and recharges the batteries like nothing I've ever found.